Let's face it, if you've spent any significant time in Minecraft, you know the insatiable hunger for cobblestone. Whether you're building a grand castle, fueling a furnace, or simply expanding your humble abode, this ubiquitous block is the bedrock of most early-game (and even late-game) endeavors. But mining it repeatedly can be a tedious chore. That's where simple manual cobblestone generator designs come in – ingenious contraptions that turn a few basic resources into an unlimited, renewable supply of this essential material.
Forget endless pickaxe swings in dark caves. With a well-placed bucket of water and a dash of lava, you can set up an efficient, self-replenishing cobblestone factory right at your fingertips. Ready to streamline your block production and get back to the fun parts of Minecraft? Let’s dive in.
At a Glance: Your Cobblestone Generator Cheat Sheet
- Renewable Resource: Cobblestone generators provide an infinite supply of cobblestone (or stone with Silk Touch).
- Core Principle: Flowing water and flowing lava interact to create cobblestone.
- Essential for Survival: Crucial for early-game resource gathering, especially in limited-resource maps like Skyblock.
- Variety of Designs: From super simple 2-resource setups to semi-automated piston contraptions.
- Efficiency Scales: More complex designs offer higher output and sometimes automated collection.
- Pickaxe Matters: Use Fortune for more cobblestone, Silk Touch for raw stone.
- Safety First: Always use inflammable blocks around lava.
Why Cobblestone Matters (And Why Generators Are Your Best Friend)
Before we start digging, let's briefly underscore why cobblestone is such a cornerstone (pun intended!) of Minecraft survival. It's the base ingredient for stone tools, furnaces, comparators, repeaters, brewing stands, and a myriad of structural blocks like stairs, slabs, and walls. Without it, your progress grinds to a halt.
Manually mining cobblestone from natural caves is fine for a bit, but it's inefficient and exposes you to dangers. A cobblestone generator, on the other hand, allows you to create a safe, controlled environment where you can mine to your heart's content. It’s a classic Minecraft "quality of life" upgrade, freeing you up to focus on exploration, farming, or more complex redstone projects. Think of it as your personal, perpetually refilling quarry.
The Elemental Dance: How Cobblestone Generators Work
At its core, every cobblestone generator relies on a fundamental interaction between two liquids: lava and water.
Here’s the breakdown:
- Flowing Lava + Flowing Water = Cobblestone. This is the magic formula we exploit.
- Flowing Water + Still Lava = Obsidian. This is the pitfall to avoid. If your water flows over a source block of lava, you get obsidian, which is slow to mine and not what we want.
- Flowing Lava + Still Water = Stone. This interaction creates regular stone blocks. While not cobblestone, it can be useful if you're aiming for stone with a Silk Touch pickaxe.
The key to a successful generator is ensuring the flowing lava and flowing water meet at a specific point, without the water flowing directly onto the lava source block.
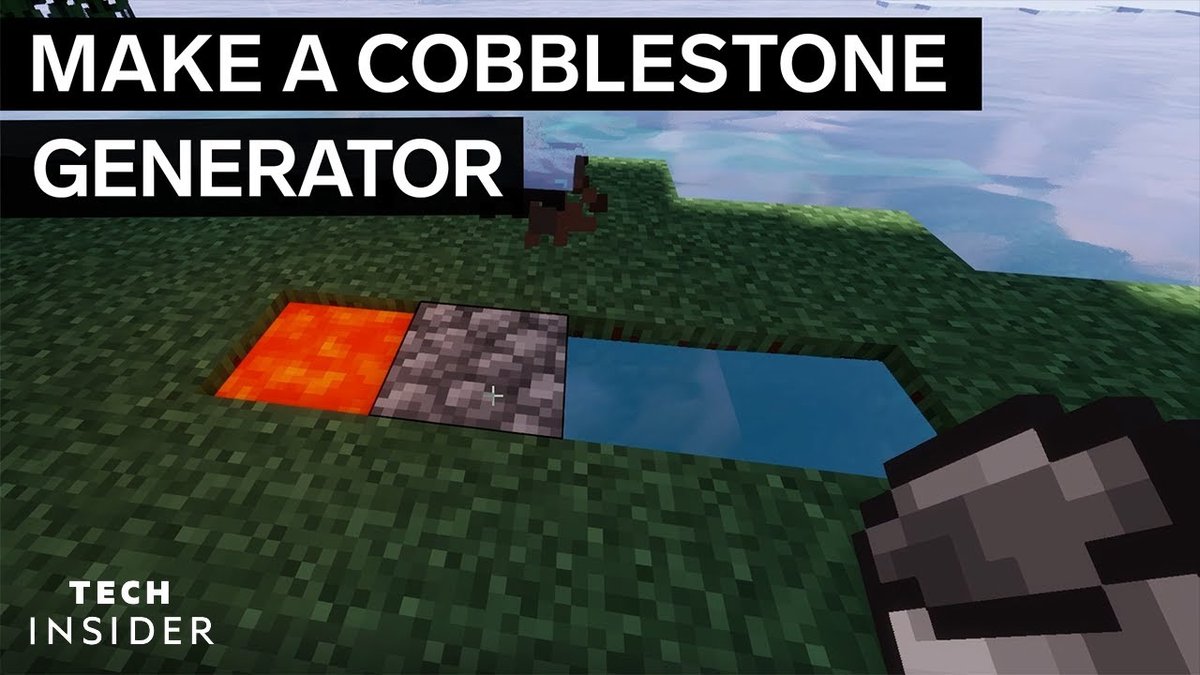
Design 1: The "Back-to-Basics" Simple Manual Cobblestone Generator
This is the quintessential generator, the one almost every Minecraft player learns first. It's incredibly easy to build, requires minimal resources, and is perfect for early game, starting a new world, or challenging maps like Skyblock where resources are scarce.
When to Use It
- Early Game: When you only have basic tools and limited resources.
- Resource-Scarce Maps: Absolutely essential for Skyblock and similar challenges where you start with almost nothing.
- Quick Cobblestone: Need a few stacks fast? This is your go-to.
- Learning the Ropes: A great way to understand the core mechanics without complexity.
Resources Needed
- 1 Water Bucket (or an ice block you can break near the generator to get a water source)
- 1 Lava Bucket
- 1 Pickaxe (any type will do, but stone or iron is better for speed)
Step-by-Step Build Guide
- Dig the Base: Start by digging a simple 4-block long, 1-block deep trench.
[ ] [ ] [ ] [ ](Top-down view)
- Create the Drop: On one end of the trench, dig the second block from that end down one more level, making it 2 blocks deep.
- Let's say your trench is
[B1] [B2] [B3] [B4]. You'll digB2down, so it looks like:[B1] [B2-top] [B3] [B4][B2-bottom]
- Place the Water: Stand at the end closer to the deeper hole (
B1in our example). Place your water bucket inB1. The water will flow into the deeper hole atB2.
[Water] [Deep Hole] [ ] [ ]
- Place the Lava: Go to the opposite end of the trench (
B4). Place your lava bucket inB4. The lava will flow towards the deeper hole.
[Water] [Deep Hole] [ ] [Lava]
- Watch the Magic: The water and lava will flow towards each other. They will meet in the middle, creating a new block of cobblestone where they interact. This is usually where
B3was.
[Water] [Deep Hole] [Cobble] [Lava]
- Mine and Repeat: Mine the generated cobblestone block. It will instantly regenerate, ready for your next swing.
Pitfalls to Avoid
- Obsidian, Not Cobblestone: If you place the lava incorrectly or the deeper hole isn't 2 blocks deep, water might flow over the lava source, creating obsidian. If this happens, mine the obsidian, scoop up your lava, and double-check your hole depth and placement.
- Slow Mining: This generator produces one block at a time. If you need massive quantities, you'll want to upgrade.
Pros & Cons
| Pros | Cons |
|---|---|
| Extremely easy to build | Low efficiency (one block at a time) |
| Minimal resource cost | No automated collection |
| Perfect for early game/Skyblock | Requires constant manual interaction |
| Simple to troubleshoot | Can be boring for long mining sessions |
Design 2: The "Workhorse" Popular Manual Cobblestone Generator (with Optional Collection)
This design is a significant step up from the basic model, offering better efficiency and, crucially, the option to add an automated collection system. It's often the second generator type players build once they have a few more resources, particularly iron for hoppers.
Why It's Popular
It strikes a great balance between ease of construction and improved utility. By creating a wider surface for the cobblestone to generate, you can mine multiple blocks more rapidly. Plus, the integrated collection system is a huge quality-of-life improvement, saving you from picking up every single block.
Resources Needed
- 2 Water Buckets
- 1 Lava Bucket
- 5 Inflammable Stairs (e.g., Cobblestone Stairs, Stone Brick Stairs, Nether Brick Stairs)
- Inflammable Solid Blocks (e.g., Cobblestone, Stone, Dirt – do not use wood!)
- 5 Hoppers (for automated collection, optional but highly recommended)
- 2 Chests (for automated collection, optional)
- 1 Sign (for water flow, optional)
Step-by-Step Build Guide (Focus on the Generator First)
- Build the Base (1st Layer):
- Start by placing a line of 5 solid blocks. This will be the base of your mining area.
[S] [S] [S] [S] [S](S = Solid Block)
- Add the Stairs: Place your 5 inflammable stairs on top of these solid blocks. Ensure they are placed right-side up (not upside down).
[St] [St] [St] [St] [St](St = Stair)[S] [S] [S] [S] [S]
- Contain the Water (2nd Layer of Blocks): Place another layer of solid blocks around the stairs, forming a U-shape. This will hold the water in place.
- Imagine a 3x5 rectangle. The stairs are in the middle row. Blocks go on the rows above and below the stairs.
[B] [B] [B] [B] [B](B = Border Block)[St] [St] [St] [St] [St][B] [B] [B] [B] [B]
- Waterlog the Stairs: Place water in each of the 5 stairs. This creates 5 water source blocks, which will flow uniformly. If you only have one water bucket, you can create an infinite water source nearby to fill the stairs.
- Create the Lava Channel (3rd Layer of Blocks): Build another layer of solid blocks above the waterlogged stairs, forming a channel or ceiling over them. Leave the very center block open. This will house your lava.
[B] [B] [B] [B] [B][B] [B] [Open] [B] [B](This is where lava goes)[Waterlogged Stairs underneath]
- Place the Lava: Place your lava bucket in the single open space in the middle of the top layer. The lava will flow down into the waterlogged stairs below.
- Cobblestone Generation: Cobblestone will now generate wherever the flowing lava meets the flowing water from the stairs. You can mine these blocks from above.
Adding an Automated Collection System (Highly Recommended)
This makes the "Popular" design shine.
- Dig for Chests: Dig a 2x1 hole beneath where your cobblestone will generate (and where you'll be mining). Place a double chest.
[C][C](Top-down view of double chest)
- Connect Hoppers: Dig back 5 blocks from the chest. Place 5 hoppers, all pointing into the chest (shift-click to place hoppers directly onto the chest and each other).
[H] -> [H] -> [H] -> [H] -> [H] -> [C][C]
- Integrate with Generator: Build your cobblestone generator directly above these hoppers. The bottom layer of solid blocks in your generator will sit right on top of the hoppers.
- Add a Sign (Optional, but Good): Place a sign above the chest, where the water flows towards it. This prevents items from flowing into the chest itself, keeping the water contained but allowing items to drop into the hoppers.
- Refine Water Flow: Ensure the water from your stairs flows towards the hoppers, gently pushing any mined cobblestone into them. The sign helps ensure the water doesn't escape but still allows item collection.
Key Considerations
- Inflammable Blocks: This cannot be stressed enough. Lava burns wood, wool, and other flammable blocks. Stick to stone, cobblestone, or netherrack.
- Sign Placement: If using a collection system, the sign is crucial to guide items into the hoppers without letting water flood out.
- Pickaxe Enchantments: A Fortune pickaxe will yield more cobblestone per block. A Silk Touch pickaxe will give you smooth stone, which can be useful for building.
Pros & Cons
| Pros | Cons |
|---|---|
| Higher efficiency than simple design | More resources required (stairs, hoppers) |
| Multiple blocks can be mined at once | Still requires manual mining |
| Optional automated collection (huge bonus) | More complex to build than Design 1 |
| Good balance of effort vs. reward | Still relatively slow for massive projects |
Design 3: The "Semi-Automated" Piston-Powered Generator
Now we're stepping into the wonderful world of redstone, even if just a little! A piston-based generator uses pistons to automatically push generated cobblestone blocks towards you, or into a collection area. While it still requires manual mining, the pushing mechanism prevents you from having to constantly move or dig into the generator itself.
When to Upgrade to This
- Consistent Cobblestone Needs: You need a steady supply and want to reduce repetitive movement.
- Learning Redstone: A great introductory project for basic redstone mechanics.
- Expanding Your Base: Useful for pushing blocks into specific areas or simply having a cleaner mining setup.
Resources Needed (for one module)
- 2 Water Buckets
- 1 Lava Bucket
- Inflammable Solid Blocks (lots, for construction)
- 5 Inflammable Stairs
- 8 Pistons (regular, not sticky)
- 2 Redstone Torches
- 1 Redstone Repeater
- 11 Redstone Dust
- 1 Lever
Basic Redstone Explanation for This Design
- Redstone Dust: Carries power from one component to another.
- Redstone Torch: A constant power source, but can be turned off if another power source activates the block it's on.
- Redstone Repeater: Boosts a redstone signal over distance and introduces a delay.
- Piston: Pushes blocks when powered.
Step-by-Step Build Guide (Focus on a single, push-out module)
- The Core Generator:
- Build the 5-stair waterlogged base as described in Design 2, surrounded by solid blocks to contain water.
- Above this, create a channel for the lava. The lava will sit one block above the first piston in the center.
- Ensure cobblestone generates in a predictable line.
- Piston Placement:
- Identify where the cobblestone will generate. You want pistons to push these blocks.
- Place 8 pistons in a line, facing the direction you want the cobblestone to be pushed. They should be at the level where the cobblestone generates.
- The first piston in the chain will be directly opposite where the lava interacts with water to make the first cobblestone.
- Redstone Powering the Piston Chain:
- Behind the line of 8 pistons, lay down redstone dust. You'll need to power all of them.
- Since redstone dust loses power over distance (max 15 blocks), you'll need a repeater.
- Place a Redstone Torch on the ground.
- Place a Redstone Repeater running from this torch into the redstone dust that powers the pistons. Adjust the repeater's delay by right-clicking it (usually a 1 or 2 tick delay is fine here).
- Connect the rest of the pistons with redstone dust.
- The redstone torch should be placed such that it powers a block, which then powers the redstone dust leading to your pistons.
- The Trigger Mechanism (Clock):
- This is where it gets a little more complex. You need a way to pulse the pistons. A simple way is to use a redstone torch clock.
- Place two solid blocks next to each other.
- Place a redstone torch on the side of one block.
- Place redstone dust on top of both blocks.
- Connect this pulsing redstone signal to your piston chain (the redstone dust behind the pistons).
- Alternative (Simpler) Lever Activation: For a truly manual piston generator, you can simply run redstone dust from your pistons to a lever. When you flip the lever, the pistons extend and stay extended. You'd mine the blocks, then flip the lever off/on to push more.
- For this guide, let's stick to the simpler lever activation as it's more "manual":
- Run redstone dust from the back of your piston line to a point where you can place a Lever.
- When you flip the lever ON, the pistons will extend. When OFF, they retract.
- The idea is you activate the generator (let cobblestone form), then flip the lever to push the blocks, then mine, then flip again to push more.
- Crucial Note: If you connect a lever directly to the pistons, the pistons will stay extended while the lever is on. This means the last piston will always be pushing into air, or the subsequent block. You might need to flip the lever quickly to "pulse" them, or create a simple clock. Let's adapt the ground truth's description slightly for a manual approach: a lever to activate/deactivate a constant push for a certain number of blocks, then you reset it.
- Revised Simple Piston Activation:
- Build the 5-stair generator base, where cobblestone generates in a line.
- Place 8 pistons facing the direction you want the cobblestone pushed, immediately behind the generation point.
- Run redstone dust directly behind these 8 pistons.
- Connect this redstone dust to a lever at a convenient location.
- Flip the lever. The pistons extend, pushing any generated cobblestone. You mine the newly available blocks. Flip the lever OFF, the pistons retract. Cobblestone regenerates. Flip ON, it pushes again.
- Lava Placement:
- Place the lava bucket one block above the first piston in the center of your 5-stair base. Ensure it flows correctly to meet the water and generate cobblestone directly in front of the pistons.
Scaling Up
You can extend the piston line for more blocks to be pushed, or build multiple piston modules side-by-side for increased output. Remember to use repeaters if your redstone signal needs to travel more than 15 blocks.
Pros & Cons
| Pros | Cons |
|---|---|
| Reduces manual movement during mining | Requires basic redstone knowledge |
| Can push multiple blocks simultaneously | More complex and resource-intensive |
| Easier integration with collection systems | Slower than fully automated designs |
| Provides a satisfying "push" animation | Still requires active input (lever flips) |
Beyond Manual: A Glimpse into Fully Automated Cobblestone Farms
While this guide focuses on simple manual cobblestone generator designs, it's worth acknowledging the pinnacle of cobblestone production: the fully automated farm. These behemoths typically employ complex redstone circuitry, TNT dupers (often an advanced feature or glitch used to create infinite TNT), and sophisticated item collection systems. They generate, destroy, and collect cobblestone without any player input once built.
These designs, like the elaborate TNT duper examples, are incredibly fast and efficient, perfect for truly massive projects that require hundreds of thousands of cobblestone (or stone). They are also significantly more resource-intensive, requiring a deep understanding of redstone, sticky pistons, observers, comparators, and even specific blocks like slime and target blocks. If you ever find yourself needing an entire mountain of cobblestone and are ready for a serious redstone challenge, that's your next step. To explore these intricate contraptions and truly master cobblestone production, you'll want to check out Our complete cobble generator guide which delves into every type of generator, from the very basic to the most complex.
Choosing Your Generator: A Decision Guide
With a few designs under your belt, how do you pick the right one for your current Minecraft needs? Consider these factors:
- Your Game Stage:
- Early Game (just started): Simple Cobblestone Generator (Design 1) is your best friend.
- Mid-Game (established base, some iron): Popular Cobblestone Generator (Design 2) with collection is a significant upgrade.
- Late-Game (ample resources, dabbling in redstone): Piston-Based Generator (Design 3) for semi-automation, or consider the fully automated farms mentioned above for truly massive projects.
- Available Resources:
- Very limited (Skyblock): Design 1.
- Some iron, basic building blocks: Design 2.
- Iron, redstone components (dust, repeaters, torches): Design 3.
- Desired Output:
- A few stacks here and there: Design 1.
- Consistent, moderate supply: Design 2.
- Faster, semi-automated flow: Design 3.
- An entire mountain's worth (hands-off): Fully automated farms (beyond this guide's scope).
- Comfort with Redstone:
- None/Beginner: Design 1 or 2.
- Basic understanding: Design 3.
- Advanced: Fully automated farms.
Cobblestone Generator Best Practices & Troubleshooting
Even the simplest designs can sometimes go awry. Here are some tips to ensure smooth operation and quick fixes.
- Always Use Inflammable Blocks: This cannot be stressed enough. Wooden blocks, wool, leaves, etc., will catch fire and burn if lava touches them. Stick to stone, cobblestone, netherrack, or even dirt for temporary builds.
- Water Source vs. Flowing Water: Remember, water source blocks (where you placed the bucket) are important. Flowing water (the current) is what interacts with lava to make cobblestone. Don't let water flow into a lava source block.
- Lava Source vs. Flowing Lava: Similar to water, lava source blocks are distinct. For cobblestone generation, you want flowing lava to meet flowing water.
- Pickaxe Choice:
- Fortune Enchantment: If you want more cobblestone per block mined, use a pickaxe enchanted with Fortune. Fortune III can yield up to 4 cobblestone blocks!
- Silk Touch Enchantment: If you want regular smooth stone (which can then be smelted into smooth stone blocks or cut into slabs/stairs), use a pickaxe with Silk Touch.
- Why Am I Getting Obsidian?
- This is the most common issue. It means water is flowing onto your lava source block, or your lava is flowing into a still water source.
- Fix: Mine the obsidian, scoop up your lava, and check your generator's layout carefully. Ensure the water and lava flow into each other at the same level, or that the water is always flowing past the lava source in a deeper channel.
- Lava Flow Issues: If lava isn't flowing where it should, make sure there's no block directly beneath its source point that would impede its flow.
- Safety First: When working with lava, always have a water bucket in your hotbar. If you accidentally fall in, you can quickly place water to cool yourself or extinguish flames.
- Consider a Roof: If your generator is exposed, consider adding a roof to prevent rain from extinguishing your lava or causing unexpected water flows.
Frequently Asked Questions (FAQs)
What's the best simple generator for Skyblock?
The Simple Cobblestone Generator (Design 1) is absolutely the best for Skyblock. It requires just one water bucket and one lava bucket, which are the basic starting resources on most Skyblock islands. Its minimal resource cost makes it indispensable in such limited environments.
Can I make a cobblestone generator without a lava bucket?
No. Lava is a critical component for cobblestone generation. The interaction between flowing lava and flowing water is what creates the cobblestone. Without lava, you cannot generate cobblestone.
How do I stop obsidian from forming instead of cobblestone?
Obsidian forms when water flows onto a lava source block. To prevent this, ensure your generator design has the water and lava flowing towards each other at the same level, or that the water flows in a channel past the lava source, not directly over it. The deeper hole in Design 1 is specifically designed to manage this interaction correctly.
What's the difference between Fortune and Silk Touch for generators?
- Fortune: When you mine cobblestone with a Fortune pickaxe, you have a chance to get more than one cobblestone block from a single mined block (e.g., Fortune III can give you up to 4). This increases your overall cobblestone yield.
- Silk Touch: When you mine cobblestone with a Silk Touch pickaxe, you will get the raw stone block instead of cobblestone. This is useful if you want to smelt it into smooth stone or use the raw stone for building.
Do I need to use specific blocks for the generator?
For the parts directly touching lava, you must use non-flammable blocks like cobblestone, stone, netherrack, bricks, or obsidian. For other structural parts, any solid block will do, but using the same material makes for a cleaner look.
Your Next Step: Building a Cobblestone Empire
You now have the knowledge to construct effective simple manual cobblestone generator designs that will drastically improve your Minecraft quality of life. Whether you're a fresh spawn on a new world or a seasoned player looking for efficient resource production, these generators are game-changers.
Start with the basics, master the popular designs, and if you're feeling ambitious, begin to experiment with redstone to add a touch of automation. The world of Minecraft is built one block at a time – make sure you have an endless supply of the most important one. Go forth, build, and never run out of cobblestone again!